Saturday 26 February 2011

Motion

Here I have tried to experiment with capturing motion with water. Here I used a large aperture and a fast shutter speed to catch the pouring water out of the hose pipe. However, the focal point of the photograph was in the centre, and lost the focus in the forefront blurring the water; this was not the aim of the photograph as the idea was to freeze the motion of the water pouring out the hose.


I used an aperture of f5 and a fast shutter speed of 1/250. To improve this photo further i would used a  bigger aperture and even faster shutter speed of 1/500 to see what difference this would have.

Have a go at capturing motion with water and see what effects you can create when changing the aperture and shutter speed slightly. Does it make a difference when capturing motion?

Shutter Speed: The Stars

Following on from the moon, I experimented with the use of bulb when following the stars.
I set my camera up with an aperture of f14 and shutter speed on bulb. I left the camera for 29 minutes facing toward the stars on a clear night. This is the result:


I wondered why the photograph turned out a red/purple colour. I researched this online and the reason why this occurred was there was a huge amount of light pollution in the sky, i have taken this photograph in my back garden. If you were to try this technique and to enhance this photograph I would recommend going out into a field or open space away from a town or well lit area. This was cut out any extra light that the lens is absorbing from the air. Overall, I think this photograph is impressive as it captures the movement in the sky.  

Shutter Speed: The Moon

Playing with shutter speed and lead in all sorts of top tricks and unique effects.
This is one I have tried out myself and found more difficult that orignally thought.
After reading upon shutter speed I thought about trying to capture the moon and stars moving across the sky on a clear night.
I set up my DSLR upon my tripod to stop my hand from shaking and causing a blurred image.
I opened up the aperture to f8 as I thought this would be large enough to let suffient light into the lens; then I experimented with a setting called blub. This setting opens the camera's shutter speed with no limit. Thus, once clicked, the camera can be left for much longer periods of time: causing a longer exposure. photo one was left for 19 minutes and this is the effect the setting blub had when playing around with the trees and the moon, almost looks like day time:


However, in photo two the camera was left for 46 muinutes and the exposure was much brighter, slightly over exposing the moon behind the trees. The effect it has created in the photograph shows the moon almost as bright as the sun gleeming through the trees. To develop upon this, I would still experiment with the length of time when leaving the camera out, as there may be a balance between 19 and 46 minute periods in which the camera was left; the exposure could be lighter, however it may not reach the limit of being overexposed.


Wednesday 23 February 2011

Another Quick Application: Balloons

Here is another link which would be a great stimulus to get the creativity juices flowing:

http://www.digitalslrphoto.com/creativeeye/gc90/

This shows that something simple and crisp as a balloon could create some interesting effects when applying depth of field and using aperture; when using a large aperture the background would blur and merge the colours into the background, however keeping the foreground crisp.
Another element would be to play with the movement of the balloons, panning the camera for a blurred motion effect. This could have colourful visual potential.

Take a look and see where it takes you?

Applying Aperture and Shutter Speed: Milk

Using aperture and shutter speed could be used in different and effective ways. On the website for Digital SLR Photography magazine there is a activity which could create stop motion, it captures the milk hitting the dry surface and breaking away from the other droplets.

To create this on a digital SLR camera:
Aperture f10
Shutter Speed 1/200
ISO 100


Why not try the same technical applications to your camera, and see what effects are created with a fast shutter speed to capture the dropping of the milk. Play with the 6 creative aperture stops and see what different effects could be created through the correct fstops and how changing the aperture and shutter speed to photograph a more creative image. Play!
Check out the website and look under creative eye and see what interesting photographs you can create through using a fast shutter speed setting on your camera:


Law of Thirds

As I have been researching further into how to use aperture and shutter speed in photography, the Law of Thirds, is an element which could effect a photograph when playing with depth of field. 

For landscape images if you mentally divide your space up into 3 horizontial and 3 vertical lines: these are considered as the ideal focal points in trying to take a correct photograph. 
The upper and lower lines are ideal horizon point for landscapes, the lines help position how much sky is needed in the photograph. The law of thirds supports depth of field becuase it will give the photograph a correct composition supported linear perspective. 


Alternatively, law of thirds can also apply vertically linking to linear perspective; it can alter the composition of the photograph through weighting of the landscape. The photograph below supports this as I have used the law of thirds grid to apply a sense of shape and structure to the image.


Tuesday 15 February 2011

Try This Out: Creating Depth

The website called: Photography Mad has some fantastic visual elements to his work, explaining how to try something new on the camera by applying the technical basics to an particular effect. The online tutorial which struck me as interesting and applies to shutter speed and aperture is the sense of depth. This ties in well with how to create a crisp photograph for certain elements such as landscape, portrait and close up photography.

http://www.photographymad.com/tips/view/creating-a-sense-of-depth-in-your-photos

This link takes you directly to the depth of field tutorial and has some interesting points about using foreground framing and using angles in the photograph. For example, crouching close to the ground add an exaggerated perspective when shooting landscapes and adding a greater amount of depth to the image.

Here is my own version of creating perspective and depth of field. This photograph was taken using a very small aperture at f20 and a shutter speed of 1/13. The aim of the photograph was to exaggerate perspective, but to also show that even on a dull, cloudy day an interesting photograph can be taken, when selecting the right aperture against shutter speed; this creates an unusual stance if exaggerating the depth.


Worth a look at the website and it has useful visual tips for you to try.

Shutter Speed: example of exposure.

Here are some examples of exposure and the difficulties that can arise when playing with technical issues of aperture and shutter speed. The first image is where a spot light has been used onto a piece of work to create shadowing; I have applied the idea of shutter speed and keeping the sensor open for varying amount of times.

Photo One:
This has worked as a whole, however after leaving the shutter speed open for 4 seconds (PUT IN NUMBER!!) the object has become slightly over exposed in the top left hand corner of the photo. This might be due to a number of reasons: that the spot light was too close to the top of the subject, causing an overload of light into one area; the shutter speed was open too long and therefore too much light was let into the sensor; therefore the aperture could be adjusted to reduce the opening of the lens thus balancing out the light exposure.


Photo Two:
This is an example of the opposite to photo one. Here the camera was changed to a faster shutter speed where the camera was only exposing the sensor to light for 2 seconds (ADD IN NUMBER). There is a huge difference in lighting. The same source of light was being used, the camera has let in less light, therefore the photograph is much darker and dull. To develop on this, I could have changed the aperture so the lens was bigger and f stop smaller, balancing out the smaller shutter speed with a larger aperture. 


F Stops and Aperture

http://www.picturecorrect.com/tips/how-to-use-aperture-and-f-stops-in-photography/

Here is a great bank of information, tutorials and tips which I have found useful when learning about aperture and shutter speed; getting to grips with the concept can be difficult to start with, but this website breaks down the stages into manageable chunks so the idea is simple to understand. 

The section about what each of the numbers mean and how they can be used is helpful and can support any photography work that is being developed. Once you have the basics then you can  build upon these techniques to begin to make something creative and unique. Apply the techniques is the fun part where you can free motion, capture light and blur images into one, just by using aperture and shutter speed.

There differences between large and small apertures and they both can give very different effects when they are used in digital photograpghy.
Large Apertures are useful for portrait photography, capturing the face of the person or subject and blurring the background to stop detraction from the subject in the foreground.
Small Apertures are great for landscapes to keep a vast amount of space in focused which creates a greater depth of field.

Take a look and see what you can find!

Sunday 13 February 2011

Definitions

Here are a few definitions explained when talking technically about digital photography.

SLR = Single Lens Reflex, the type of camera that is being used to take the photographs.

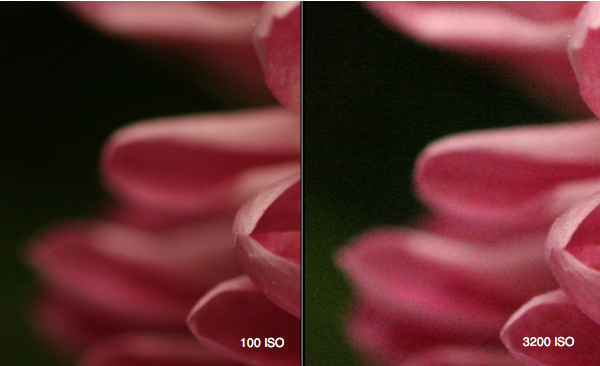
ISO = is the light sensitivity which is expressed with the speed of the photograph taken. The lower the ISO number is on the camera the less sensitive is sensor is to the light; the higher the number, the more senstive the camera becomes to the light. The effect this has on the  photograph means if there is less light upon the object, the higher the ISO number needs to be. The only drawback to setting your camera at a high ISO number means the image becomes 'grainy' or the 'noise' is more obvious. For exmaple using a ISO of 100 means there will be less light allowed into the lens, the picture slightly blurred, but when the ISO is raised to 3200, the image is more focused however becomes grainy, almost looking pixelated.
Iso-100-3200
(Photography- Digital Photography School- Matt Brett).

Apperture = the size of the lens opening on the camera and controls how much light is let in when capturing a photo. A Larger apperture lets in more light and a smaller apperture lets in less light. Apperture sizes run in f stops. The larger to f stop number the smaller the opening, and the smaller the f stop the number the larger the opening.

Shutter Speed = is how long the shutter sensor is open and exposed to light. How long the shutter is open depends on how much light is let into the camera sensor. If the shutter is open too long, then the subject will in the photo will be too light, and if the shutter is open for a small amount of time, then the subject will be too dark (if the apperture setting stays the same throughout).
The faster the shutter speed creates a stop action.
The slower the shutter speed creates a blurred smoother action in the photograph.


Exposure = the combination of aperture and shutter speed which creates different exposures and a range of different depth of field. A large aperture and short exposure will reduce the depth of field, only having the foreground in focus; a small aperture and long exposure will do the reverse and have a greater depth of field bringing all aspects of the subject and background into focus.

Saturday 12 February 2011

Tutorials

http://www.youtube.com/user/the365daysproject

http://365c.am/tutorials/

The 365 days project is based around photography, encouraging people to join in and begin learning basic steps to using a camera and creating great photography. 
The aim is to take a photograph daily and support these photos with the tutorials and online information that has been posted upon YouTube and the 365 days project website. 
There are simple tricks and techniques that can be developed on your own with the camera you already have. A personal favourite of mine is the 'light writing'. The host on the online tutorials uses a pen light and draws letters within the air and the camera catches these at a slow speed. The result is a blurred figure moved with crisp bright writing in the foreground with luminous lettering. This small yet simple trick is one example of the huge amount of scope that can be used for capturing that perfect photo. 

 (Photo by David Airey)


Useful website for quick snaps of information...

http://www.geofflawrence.com/index.htm

This website is really useful! There are so many areas of basic and developed photography skills which would be helpful to read through and gain some extra tips from.
For example an interesting point which I found useful for my own learning was 'The Top Ten Tips of Photography' The creator of the website has made a list of tips from all areas of how to take a good photograph; for example these could be the only 10 points to focus on when learning how to develop technical skills in photography and learn in depth on perfecting your subject of interest which you are photographing. 

Definitely worth a look to gain basic information and diagrams which are well explained and clear to follow. 

Welcome

This blog is for students who would like to learn more about digital photography who would like to learn the basics on setting up a camera,  learning how to use apperture and shutter speed, and any other useful tips which can be used to enhance photography. This online blog will be where information, useful articles and visual research will be posted for viewers to see and use at their will; information which I found useful in supporting my own indpendent learning of a digital photography.
Tutorials will be displayed in the form of a video, and the sessions will be short however simple to understand and easily accessible.